Vanilla Rhubarb Earl Grey Jam
2018-08-20 22:00:42
Yields 8
Rhubarb is a popular favorite and readily available starting in June in the Calgary area.
Ingredients
- 8 cups chopped rhubarb
- 4 cups granulated sugar
- 1 cup double strength brewed Earl grey tea
- 1 pkg (85 ml 3 oz) liquid pectin
- 1 vanilla bean
- Juice of 1 lemon
- Pinch of salt
Instructions
- Prepare a boiling water bath and jars to sterilize. Place the lids in a small saucepan, cover them with water and simmer over very low heat.
- In a large, nonreactive pot, combine the rhubarb, sugar and tea and bring to a boil. Add the vanilla and seeds, lemon juice and salt to the pot and let the mixture bubble gently over medium-high heat for 15-20 minutes stirring regularly until the rhubarb has broken down.
- Add the packet of liquid pectin and increase the heat to high to bring the jam up to a rolling boil. Let the jam boil vigorously for 3 to 4 minutes, stirring frequently to prevent the bottom from burning.
- Remove the pot from the heat and ladle the jam into prepared jars. Wipe the rims, apply the lids and rings and process in a boiling water bath for 10 minutes.
Adapted from Food in Jars
Adapted from Food in Jars
https://www.poppyinnovations.ca/
Homemade Applesauce
2018-07-13 16:20:07
Yields 1
Applesauce is an excellent dish for using apples that are bruised or marked as the bad spots can be cut out. It is easy to make and freezes well so don’t let your apples go to waste.
Apples vary in their sweetness level, depending on the variety and how late in the season they are picked. The amount of sugar you will want to add will depend on how sweet your apples are, and how sweet you would like your applesauce to be. It pairs well with pork chops for savory dishes, it's terrific with cottage cheese as a snack or light lunch, and it's great with vanilla ice cream or yogurt.
Prep Time
15 min
Cook Time
40 min
Ingredients
- 3 to 4 lbs of apples (about 7 to 10 apples, depending on the size), cored, and quartered (use apples varieties that are good for cooking such as Granny Smith, Mcintosh, Fugi, Jonathan, Jonagold, or Golden Delicious)
- 2 Tbsp lemon juice
- 3 inches of cinnamon stick
- 2 Tbsp dark brown sugar
- 1 Tbsp white sugar
- 1 cup of water
- 1/2 teaspoon of salt
Instructions
- Place the cored, and quartered apples into a large pot. Add the strips of lemon peel, the lemon juice, cinnamon stick, sugars, water and salt. Bring to a boil on high heat, then lower the temperature, cover the pot, and maintain a low simmer for 20-30 minutes, until the apples are completely tender and cooked through.
- Once the apples are cooked through, remove the pot from the heat. Remove the cinnamon stick. Use a food mill to mash the cooked apples and remove the skins of the apples. If you want a chunkier applesauce, use a masher instead of a food mill.
- Add more sugar to taste. If too sweet, add more lemon juice.
- This applesauce is delicious either hot or chilled. Freezes well and will last at least a year in a cold freezer.
Notes
- Youngsters aged 4 to 9 in our Cre*Ate Kids Garden Club made this recipe to learn about minimizing food waste. Slightly bruised, marked or deformed fruit can readily be used in recipes to enjoy its natural goodness. It's a valuable lesson that the kids easily understand.
Adapted from Simply Recipes
Adapted from Simply Recipes
https://www.poppyinnovations.ca/
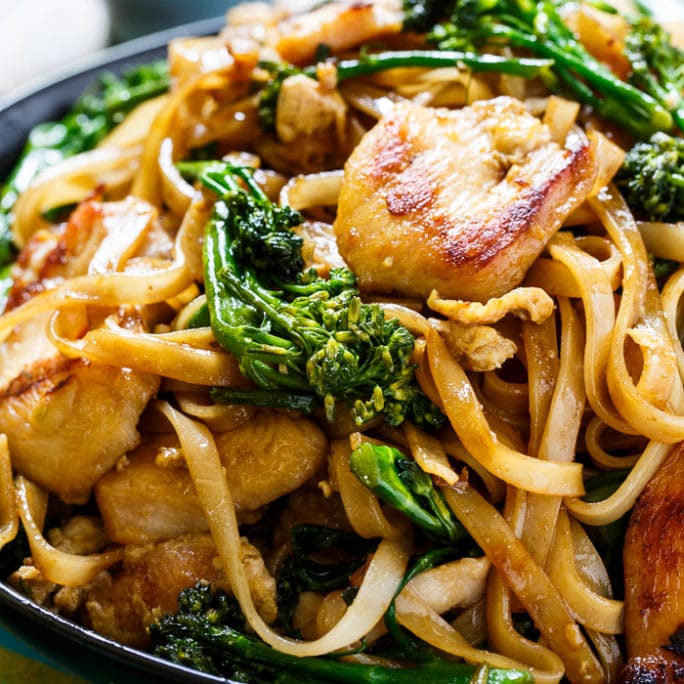
Thai-Style Stir-Fried Noodles with Chicken and Broccolini (Pad See Ew)
2018-07-13 15:49:38
Serves 4
Kids in our Culinary Masters summer cooking camp were exploring kitchen science hands-on with this version of Thai Pad See Ew. The chewy, lightly charred rice noodles, with chicken, crisp broccoli, and moist egg, bound with a sweet and salty soy-based sauce was a big hit! Do you know why baking soda is used? Check out the notes to learn why.
Chile Vinegar
- ⅓ cup distilled white vinegar
- 1 serrano chile, stemmed and sliced into thin rings
Stir-Fry
- 2 (6 ounce) boneless, skinless chicken breasts, trimmed and cut against grain into 1/4 -inch-thick slices
- 1 teaspoon baking soda
- 8 ounces (¼ inch wide) rice noodles
- ¼ cup vegetable oil
- ¼ cup oyster sauce
- 2 tablespoons packed dark brown sugar
- 5 teaspoons tamari sauce (gluten-free)
- 1 tablespoon distilled white vinegar
- 1 teaspoon molasses
- 1 teaspoon fish sauce
- 3 garlic cloves, sliced thin
- 10 ounces broccolini, florets cut into 1-inch pieces, stalks cut on bias into ½-inch pieces (5 cups)
For the Chile Vinegar
- Combine vinegar and serano in bowl. Let stand for at least 15 minutes.
For the Stir Fry
- Combine chicken, 2 tablespoons water and baking soda in bowl. Let stand for 15 minutes. Rinse chicken under cold running water and drain well.
- Bring 1 ½ quarts water to b inoil in kettle or saucepan,. PLace noodles in large bowl. Pour boiling water over noodles/ Stir, then soak until noodles are almost tender, about 8 minutes. stirring well halfway through soaking. Drain noodles, then rinse under cold running water. Darin again. transfer to dry bowl, add 2 teaspoons oil, and toss to coat.
- Whisk oyster sauce, sugar, tamari sauce, vinegar, molasses, and fish sauce together in bowl.
- Heat 2 teaspoons oil and garlic in 12-inch nonstick skillet over high heat, stirring occasionally, until garlic is deep golden brown, 1 to 2 minutes. Add chicken and 2 tablespoons sauce mixture, toss to coat, and spread chicken into even layer. Cook, without stirring, until chicken begins to brown, 60 to 90 seconds. Using tongs, flip chicken and cook, without stirring, until second side begins to brown 60 to 90 seconds. Push chicken to one side of skillet. Add eggs to clearing. Using rubber spatula, stir eggs gently and cook until set but still wet, 30 to 60 seconds. stir eggs and chicken and continue to cook breaking up large pieces of egg, until eggs are fully cooked, 30 to 60 seconds. Transfer chicken mixture to bowl.
- Heat 2 teaspoons of oil in now-empty Skillet until smoking. Add broccolini and 2 tablespoons sauce and toss to coat. Cover skillet and cook 2 minutes, stirring once halfway through cooking/ Remove lid and continue to cook until broccolini is crisp and very brown in spots, 2-3 minutes, stirring once halfway through cooking. Transfer broccolini to bowl with chicken mixture.
- Heat 2 teaspoons of oil in now-empty Skillet until smoking. Add half of noodles and 2 tablespoons sauce to coat. Cook until noodles are starting to brown in spots, about 2 minutes, stirring halfway through the cooking. Transfer noodles to bowl with chicken mixture. Repeat with remaining 2 teaspoons oil, remaining noodles. and remaining sauce. When second batch of noodles is cooked, add contents of bowl back to skillet and toss to combine. cook without stirring until everything is warmed through, 60 to 90 seconds. Transfer to platter and serve immediately, passing chile vinegar separately.
Notes
- Boneless skinless chicken lacks skin and bones to protect the delicate meat from over-cooking resulting in a dry, fibrous texture. To increase the margin of error while cooking boneless, skinless chicken, a baking soda and water solution is employed. The solution raises the meat’s pH preventing the meat proteins from bonding together as tightly as they would otherwise allowing us to cook the chicken thoroughly without fear of dry, chewy chicken. We wash the solution so the chicken/stir-fry doesn’t have a residual baking soda flavor.
Adapted from Cook’s Illustrated Special Collector’s Edition “Cook it Right 2016”
Adapted from Cook’s Illustrated Special Collector’s Edition “Cook it Right 2016”
https://www.poppyinnovations.ca/
No Bake Granola Bars
2018-06-29 14:57:49
Yields 9
Healthy, no-bake granola bars with just 5 ingredients and a sweet, crunchy texture. Peanut butter and maple syrup complement each other perfectly in this ideal portable breakfast or snack.
Prep Time
10 min
Cook Time
5 min
Total Time
15 min
Ingredients
- 1 heaping cup packed (~220 g) dates, pitted (deglet noor or medjool)*
- 1/4 cup (84 g) maple syrup or agave nectar (or honey if not vegan)
- 1/4 cup (64 g) creamy salted natural peanut butter or almond butter
- 1 cup (112 g) roasted unsalted almonds, loosely chopped (see instructions for roasting nuts)
- 1 1/2 cups (135 g) rolled oats (gluten-free for GF eaters)
Instructions
- Process dates in a food processor until small bits remain (about 1 minute). It should form a "dough" like consistency. (Mine rolled into a ball.)
- Optional step: Toast your oats (and almonds if raw) in a 350-degree F (176 C) oven for 10-15 minutes or until slightly golden brown. Otherwise, leave them raw - I prefer the toasted flavor.
- Place oats, almonds and dates in a large mixing bowl - set aside.
- Warm honey and peanut butter in a small saucepan over low heat. Stir and pour over oat mixture and then mix, breaking up the dates to disperse throughout.
- Once thoroughly mixed, transfer to an 8x8-inch baking dish or other small pan lined with plastic wrap or parchment paper so they lift out easily.
- Press down firmly until uniformly flattened - use something flat, like a wooden spoon, to press down and really pack the bars, which helps them hold together better.
- Cover with parchment or plastic wrap, and let firm up in fridge or freezer for 15-20 minutes.
- Remove bars from pan and chop into 10 even bars (or 9 squares). Store in an airtight container for up to a few days. These bars can also be frozen for longer storage.
Notes
- Vary the flavours with some of these additions: chocolate chips, dried fruit, nuts, banana chips, vanilla, etc.
https://www.poppyinnovations.ca/
Pork Tenderloin with Roasted Cherries and Shallots
2018-06-01 02:06:39
Serves 4
The perfect combination for summer dining when cherries are in season. An easy recipe that will impress your dinner guests and your family.
Total Time
39 min
Ingredients
- 2 tablespoons canola oil, divided
- 3/4 teaspoon kosher salt, divided
- 1/2 teaspoon black pepper
- 1/2 teaspoon ground cumin
- 1/8 teaspoon ground cinnamon
- 1 (1-pound) pork tenderloin, trimmed
- 3 large shallots, quartered
- 8 ounces fresh cherries, pitted and halved
- 1/4 cup unsalted chicken stock
- 2 tablespoons balsamic vinegar
- 1/2 teaspoon brown sugar
- 1 tablespoon butter
- 1/4 cup coarsely chopped fresh flat-leaf parsley
Instructions
- Preheat oven to 425°.
- Heat a large ovenproof skillet over medium-high heat. Add 1 tablespoon oil; swirl to coat. Combine 1/2 teaspoon salt, pepper, cumin, and cinnamon. Rub pork evenly with spice mixture. Add pork to pan; sauté 4 minutes. Turn pork over; place pan in oven and bake at 425° for 15 minutes or until a thermometer registers 140°. Remove pork from pan; place on a cutting board (do not wipe out pan). Let pork stand 10 minutes. Cut into thin slices.
- Add remaining 1 tablespoon oil to pan; swirl to coat. Add shallots and cherries; sprinkle with remaining 1/4 teaspoon salt. Place pan in oven; bake at 425° for 10 minutes (do not turn cherries). Carefully remove pan from oven; place over medium-high heat. Stir in stock, vinegar, and sugar; bring to a boil. Cook 4 minutes or until liquid is syrupy. Remove from heat; stir in butter. Serve cherry mixture with pork; sprinkle with parsley.
https://www.poppyinnovations.ca/
Sugar Free Raspberry Lemonade
2018-05-29 19:02:47
Yields 1
It's magic lemonade! This raspberry lemonade is healthy, sugar-free, and free from artificial sweeteners. The members of the 4H group found this drink so refreshing, perfect for their picnic outing.
Ingredients
- 1 tablespoon fresh lemon juice
- ¼ cup frozen raspberries
- ¾ cup apple cider (cloudy apple juice)
- ¾ cup coconut water
- Crushed ice, to serve
Instructions
- Blend the lemon juice, frozen raspberries, apple juice and coconut water until smooth.
- Either drink the lemonade by itself, or pour over crushed ice. Best when chilled. Enjoy!
https://www.poppyinnovations.ca/
Gougères
2018-05-18 03:11:15
Yields 36
Gougères are essentially French cheese puffs. They are made of a dough called pâte à choux but with a considerable amount of cheese mixed into the dough. They are light, airy and cheesy.
Ingredients
- ½ cup whole milk
- ½ cup water
- 8 tablespoons (1 stick) unsalted butter, cut into 4 pieces
- ½ teaspoon salt
- 1 cup all-purpose flour
- 5 large eggs at room temperature (this is important for the dough!)
- 1 ½ cup coarsely grated cheddar cheese
Instructions
- Divide oven into thirds by positioning racks on the top and bottom third. Pre-heat to 425F.
- Line 2 baking sheets with parchment paper
- In a heavy-bottomed medium sauce, bring the milk, water, butter and salt to a rapid boil over high heat
- Add the flour all at one time, lower the heat to medium-low. With a wooden spoon, immediately start stirring energetically. The dough will come together forming a light crust on the bottom of the pan. Keep stirring with energy for an additional minute or two to dry the dough slightly. The dough should now be very smooth.
- Turn the dough into a large bowl and let sit for a minute.
- Add eggs - one at a time - beating until each egg is completely incorporated before adding the next one. Don’t worry is the dough separates, it will come together by the time the last egg is added.
- Beat in the Grated Cheese!
- Once the dough is made it should be spooned onto the lined baking sheet immediately. Spoon about 1 tbsp (more for larger puffs) of dough onto the sheet leaving about 2 inches of space between dough mounds.
- Slide the sheets into the oven and immediately reduce the heat to 375F. Bake for 12 minutes, rotate the pans front to back and top to bottom and continue baking for another 12-15 minutes until the Gougères are golden, firm and puffed. Serve warm or transfer to racks to cool.
Notes
- Note on Storage: The best way to store Gougères is to shape the dough into mounds, freeze the raw mounds on baking sheets and once they are solid, packed and stored in an airtight plastic bag or tupperware. To bake: take them straight out of the freezer (do not defrost) and bake according to the original directions (give them a couple more minutes in the oven since they were frozen). Voilà!
https://www.poppyinnovations.ca/
Poached Chicken & Relish Wraps with Dipping Sauce
2018-05-18 02:55:33
Serves 8
Fermented mixed vegetables are a tangy and tasty addition to these rice paper wraps. A fresh idea for lunch at work or to slice for serving as an light appetizer.
Poached chicken
- 4 boneless skinless chicken breasts
- ½ tsp salt
- Aromatics: smashed garlic cloves, 1 inch of ginger, sliced
- 1 cup cooking liquid: apple juice (water, wine, apple juice)
- water (as per directions)
Wraps
- 16 rice paper wrappers (~9 inches in diameter)
- found in the International or Asian food aisle
- 2 cup cooked rice vermicelli noodles
- 3 green onions, sliced
- 2 cups shredded romaine lettuce
Garlic Lime Dipping Sauce
- 2 Tbsp rice vinegar
- 1 tbsp soy sauce
- 1 tbsp water
- 1 tbsp liquid honey
- 1 clove garlic, minced
- pinch of chili flakes for heat
- Juice of 1 lime
Poach chicken
- In a large sauce pot, place the chicken in a single layer. Sprinkle with salt and aromatics.
- On a stove top, Add 1 cup poaching liquid, add enough cool water to cover chicken by ~ 1 inch.
- Bring liquid to a boil. Reduce heat to a simmer, cover the pot.
- Allow chicken to cook until 165 deg F. (start to check temperature at ~10 minutes). Remove from liquid, place on cutting board.
- In a large pot of boiling water, cook rice vermicelli.
- While chicken and vermicelli are cooking, prepare lettuce & onion
- Drain and mince in food processor the fermented mixed veg*, pluse until relish like substance.
- Prepare garlic lime dipping sauce. Mix ingredients together in a sauce pan. Heat, Stir in juice of 1 lime. Put in a medium-sized bowl.
- Add ~1 inch of water to a large frying pan, bring water to a boil; keep water hot. This will be for cooking the rice wrappers.
When you have all ingredients ready, start assembling rolls
- Dip 1 rice paper into frying pan of hot water to soften (Work with one at a time). Set on a cutting board.
- In the middle of the rice wrapper, add in vermicelli and small amounts of your prepared vegetables & relish.
- Fold the sides over the filling and roll up tightly. Set aside on a plate and cover with a clean damp towel until ready to serve.
https://www.poppyinnovations.ca/
Lemon Posset with Shortbread
2018-02-05 00:51:08
Yields 4
A very "English" dessert, a light pairing with a heavier meat course. Lemon is has been known for its therapeutic properties for generations; they help strengthen the immune system and help cleanse and promote digestion in the stomach.
Prep Time
20 min
Cook Time
20 min
Total Time
40 min
Posset
- 300ml heavy cream
- Zest and juice from 1 1/2 lemons
- 1/3 cup caster sugar
Shortbread
- 1/2 cup unsalted butter, softened
- 1/4 cup sugar
- 1 1/3 cup all-purpose flour
- 1/2 tsp vanilla extract
Instructions
- Place the double cream, lemon zest and sugar in a medium saucepan. Bring up to boil and boil for 3 minutes.
- After 3 minutes, take pan off heat and add the lemon juice. Pour into 4 ramekins or cups. Place in the refrigerator to set for at least 1 hour. Serve chilled with whipped cream and fresh berries.
For the shortbread
- Preheat your oven to 375F.
- Cream the softened butter, sugar and vanilla together until light and fluffy. Fold in the flour and mix into a soft dough.
- Roll out to 1cm thickness on a lightly floured surface. Cut into rounds or shortbread fingers and spread out evenly on two lined baking trays. Chill for 20 minutes in the fridge. Once chilled, bake the shortbread for 15-20 minutes or until a lightly golden. Allow to cool on the tray for 5 minutes.
https://www.poppyinnovations.ca/
Lemon Dill Sauerkraut
2017-08-21 18:24:16
Yields 6
Did you know March 24th is International Sauerkraut Day? Make your batch while cabbage is in season to commemorate the special day in March! • Sauerkraut’s fermentation process produces beneficial probiotics that aid in a healthy gut.
Prep Time
25 min
Ingredients
- 2 heads (about 6 pounds) cabbage
- 1½–2 tablespoons unrefined sea salt
- 4 tablespoons lemon juice
- 1–2 tablespoons dried dill (to taste)
- 4–5 cloves garlic, finely grated
Instructions
- To prepare the cabbage, remove the coarse outer leaves. Rinse a few unblemished ones and set aside. Rinse the rest of the cabbage in cold water. With a stainless knife, quarter and core the cabbage. Thinly slice with knife or mandoline, then transfer cabbage to a large bowl.
- Add 1 tablespoon of the salt, lemon juice and the dill, with your hands massage it into the leaves, then taste. You should taste the salt without it being overwhelming. Add more salt if necessary.
- The cabbage will soon look wet and limp, liquid will begin to pool. At this point mix in the garlic. If you don’t see much brine in the bowl, let it stand, covered, for 45 minutes, then massage again.
- Transfer cabbage to 2-quart jar (half gallon or 64 fl oz), a few handfuls at a time, pressing down on the cabbage with your fist or tamper to get out air pockets. You should see some brine on top of the cabbage when you press. Leave 2 to 3 inches of headspace for a jar. Top the cabbage with one or two of the reserved outer leaves. Top the leaves with a weight (water-filled jar or ziplock bag) that covers as much of the vegetables as possible.
- Set aside the jar on a baking sheet to ferment; nearby, out of direct sunlight, and cool, for 4 to 14 days. Check daily to make sure the cabbage is submerged, pressing down as needed.
- You can start to test kraut on day 4. You’ll know it’s ready when it’s pleasingly sour and pickle-y tasting, without the strong acidity of vinegar; the cabbage has softened a bit but retains some crunch; it is more yellow than green and slightly translucent, as if it’s been cooked.
- Ladle the kraut into smaller jars and tamp down. Pour in any brine that’s left. Tighten the lids, then store in the refrigerator. This kraut will keep, refrigerated, for 1 year.
https://www.poppyinnovations.ca/