How to buy pumpkins:
For cooking purposes, small pie pumpkins are your best bet. They’re easier to prepare, and much sweeter. Look for firm pumpkins with smooth orange skin that feel heavy for their size. Avoid pumpkins with bruises or spots.
(If shopping for Halloween, choose large pumpkins with thin walls to make carving easier. Look for ones with a strong stem and a round shape that will stand upright.)
How to use pumpkins:
Pumpkins are tasty in pies, muffins, cakes, breads, casseroles and soups. Pumpkin is a good substitute in any recipe that calls for butternut squash or other winter squash.
First, wash your pumpkin thoroughly. If steaming, peel it, seed it and cut into cubes. If roasting, cut your pumpkin in half and seed it. Once cooked, you can scoop the flesh from the hard outer peel and mash and puree it.
Pumpkin seeds also make a tasty and healthy snack. Wash, then spread on a baking sheet and roast in the oven until golden brown and crunchy.
How to store pumpkins:
You can keep whole pumpkins in a cool, dry spot for up to a month. Once cut, wrap your fresh pumpkin in plastic wrap and store in the fridge for up to 5 days. Cooked pumpkin can be frozen for up to 10 months.
One of our favourite pumpkin recipes is Pumpkin Butter
It is perfect for a spread on muffins and scones, or in desserts. Or get more creative and layer it in trifle, sandwich it between two cookies, or swirl it into cheesecake and brownies, it’s sure to be your new comfort food. It can also be stored in the freezer for up to 1 year. Delightful to use in the dead of winter when we want all those warm flavours.
]]>- 4 pounds Roma tomatoes, cored and peeled
- 1 cup minced yellow onion
- 2 jalapeno peppers, seeds removed, chopped
- 2 garlic cloves, roughly chopped
- 2 serrano chilies, chopped
- 1 green pepper, chopped
- 4 tbsp bottled lime juice
- 4 tsp salt
- Zest 1 lime
- Prepare a boiling water bath and sterilize jars, keeping them in the canning pot until ready to use.
- Place all ingredients in a blender or food processor and blend in short bursts until the ingredients are well incorporated. Don’t overprocess to a puree.
- Pour the salsa into a medium saucepan and bring to a boil over high heat. Lower the heat to medium-low and simmer for 5 minutes.
- Funnel hot mixture into hot, sterilized canning jars, leaving ¼ inch headspace. Wipe jar rims. Cover with lid. Screw on ring band until resistance is met; increase to fingertip tight.
- Place in boiling water canner for 15 minutes (adjusted for Calgary altitude).
- Remove jars from canner and let cool on cooling rack.
- Adjust heat of salsa to your liking and try a variety of hot peppers. Disposing of seeds from chilies creates milder taste.
- 5 lbs beets
- 8 cups sugar
- 2/3 cup fresh lemon juice
- Zest of 2 medium oranges
- 1/2 cup fresh orange juice
- 2 Tbsp pink peppercorns, crushed
- Boil beets until tender, about 20 - 30 minutes. Cool slightly then peel and process in a food processor until finely minced.
- Combine all ingredients in a large pot and bring to a boil over high heat, stirring often. Be careful, this will splutter! Cook to set at 220 degrees F. Check set on a cold plate.
- Once it is set, you can let it cool and keep it in the fridge or if you would like to preserve these beets for long term storage, then follow the instructions for canning.
- Prepare a boiling water bath and sterilize your jars in the boiling water. Do not boil the lids.
- Ladle the hot mixture into hot sterilized jars, wipe rims, remove air bubbles by poking the product with a non-metal device such as a wooden spoon handle.
- Place lids on jars, tightening only until resistance is felt and process jars in the canner for 25 minutes (adjusted for Calgary Altitude).
- 1 cup shredded carrots
- 3 cups broccoli florets
- 1 garlic clove
- 2 eggs
- 1 1/4 cups seasoned breadcrumbs divided
- 3/4 cup shredded cheddar cheese
- 1/2 teaspoon onion powder
- 1/2 teaspoon black pepper
- 1 tablespoon canola oil
- 1½ cups greek yogurt
- 4 cloves garlic
- 1 small cucumber, peeled and chopped
- 2 teaspoons olive oil
- Juice of ½ lemon
- 2 tablespoons dill
- Kosher salt, to taste
- Combine ingredients in a bowl and mix until combined.
- Shred carrots.
- Steam broccoli in the microwave for two minutes or until tender.
- Place shredded carrots, steamed broccoli, garlic, eggs, 1 cup of the breadcrumbs, cheese, onion powder, and black pepper in food processor and pulse for 15 seconds or until well combined. Mixture should form easily into a ball. If it's too crumbly, add water one teaspoon at a time until you achieve the desired consistency.
- Form mixture into balls, about a tablespoon each (I use a cookie scoop). You should get about 25 nuggets. Flatten slightly into round discs about 1/2-inch thick.
- Place remaining 1/4 cup breadcrumbs in a shallow dish. Coat each veggie nugget with breadcrumbs.
- Heat oil in a skillet on medium high heat until it sizzles when sprinkled with water droplets.
- Arrange nuggets in skillet and cook about 4 minutes each side, or until golden brown and crispy.
- 8 cups chopped rhubarb
- 4 cups granulated sugar
- 1 cup double strength brewed Earl grey tea
- 1 pkg (85 ml 3 oz) liquid pectin
- 1 vanilla bean
- Juice of 1 lemon
- Pinch of salt
- Prepare a boiling water bath and jars to sterilize. Place the lids in a small saucepan, cover them with water and simmer over very low heat.
- In a large, nonreactive pot, combine the rhubarb, sugar and tea and bring to a boil. Add the vanilla and seeds, lemon juice and salt to the pot and let the mixture bubble gently over medium-high heat for 15-20 minutes stirring regularly until the rhubarb has broken down.
- Add the packet of liquid pectin and increase the heat to high to bring the jam up to a rolling boil. Let the jam boil vigorously for 3 to 4 minutes, stirring frequently to prevent the bottom from burning.
- Remove the pot from the heat and ladle the jam into prepared jars. Wipe the rims, apply the lids and rings and process in a boiling water bath for 10 minutes.

- 2 cups granulated sugar
- 2 cups water
- 5 bags Oolong Tea (floral is nice)
- 4 large peaches, sliced (no need to peel them)
- 2 T powdered pectin
- Prepare five jars (125 ml). Bring a water bath to a boil.
- In large saucepan, bring sugar and water to a simmer until the sugar has dissolved. Add four tea bags to pot and let them simmer for 5 minutes.
- Remove the tea bags and add the peaches. Let simmer for approximately 10 minutes. Put a small spoonful on a plate that has been chilled in the freezer to taste. When the balance of peach and oolong taste good to you, strain the liquid through a fine mesh sieve. Press the fruit lightly to remove as much liquid as possible without pushing through the fruit pulp.
- Return the syrup to the pot and add pectin as well as the remaining tea bag. Bring to a rapid boil. When the jelly liquid reaches 220 degrees, it is done.
- Remove pot from heat, take out the tea bag and pour jelly into prepared jars leaving ¼ inch headspace. Wipe rims, cover with lids. Screw on bands until resistance is met; increase to fingertip tight. Place in boiling water canner for 20 minutes.
- Turn off heat. Uncover and let jars stand in canner for 5 minutes. Lift up rack. With canning tongs; transfer jars to cooling rack; let cool undisturbed for 24 hours.
- We made this recipe in our Canning Classes in Calgary and our guests loved it. We tried it with the skins on and off the peaches. The skins make the jelly a beautiful blush colour so save yourself the step of peeling the peaches.
- To add new flavours, with different types of tea or herbs like mint to complement the flavour.
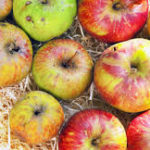
- 3 to 4 lbs of apples (about 7 to 10 apples, depending on the size), cored, and quartered (use apples varieties that are good for cooking such as Granny Smith, Mcintosh, Fugi, Jonathan, Jonagold, or Golden Delicious)
- 2 Tbsp lemon juice
- 3 inches of cinnamon stick
- 2 Tbsp dark brown sugar
- 1 Tbsp white sugar
- 1 cup of water
- 1/2 teaspoon of salt
- Place the cored, and quartered apples into a large pot. Add the strips of lemon peel, the lemon juice, cinnamon stick, sugars, water and salt. Bring to a boil on high heat, then lower the temperature, cover the pot, and maintain a low simmer for 20-30 minutes, until the apples are completely tender and cooked through.
- Once the apples are cooked through, remove the pot from the heat. Remove the cinnamon stick. Use a food mill to mash the cooked apples and remove the skins of the apples. If you want a chunkier applesauce, use a masher instead of a food mill.
- Add more sugar to taste. If too sweet, add more lemon juice.
- This applesauce is delicious either hot or chilled. Freezes well and will last at least a year in a cold freezer.
- Youngsters aged 4 to 9 in our Cre*Ate Kids Garden Club made this recipe to learn about minimizing food waste. Slightly bruised, marked or deformed fruit can readily be used in recipes to enjoy its natural goodness. It's a valuable lesson that the kids easily understand.
- ⅓ cup distilled white vinegar
- 1 serrano chile, stemmed and sliced into thin rings
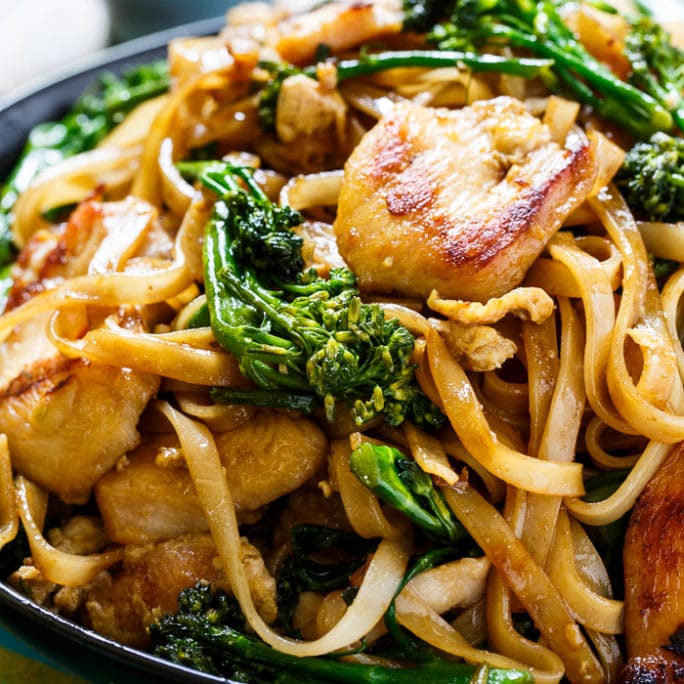
- 2 (6 ounce) boneless, skinless chicken breasts, trimmed and cut against grain into 1/4 -inch-thick slices
- 1 teaspoon baking soda
- 8 ounces (¼ inch wide) rice noodles
- ¼ cup vegetable oil
- ¼ cup oyster sauce
- 2 tablespoons packed dark brown sugar
- 5 teaspoons tamari sauce (gluten-free)
- 1 tablespoon distilled white vinegar
- 1 teaspoon molasses
- 1 teaspoon fish sauce
- 3 garlic cloves, sliced thin
- 10 ounces broccolini, florets cut into 1-inch pieces, stalks cut on bias into ½-inch pieces (5 cups)
- Combine vinegar and serano in bowl. Let stand for at least 15 minutes.
- Combine chicken, 2 tablespoons water and baking soda in bowl. Let stand for 15 minutes. Rinse chicken under cold running water and drain well.
- Bring 1 ½ quarts water to b inoil in kettle or saucepan,. PLace noodles in large bowl. Pour boiling water over noodles/ Stir, then soak until noodles are almost tender, about 8 minutes. stirring well halfway through soaking. Drain noodles, then rinse under cold running water. Darin again. transfer to dry bowl, add 2 teaspoons oil, and toss to coat.
- Whisk oyster sauce, sugar, tamari sauce, vinegar, molasses, and fish sauce together in bowl.
- Heat 2 teaspoons oil and garlic in 12-inch nonstick skillet over high heat, stirring occasionally, until garlic is deep golden brown, 1 to 2 minutes. Add chicken and 2 tablespoons sauce mixture, toss to coat, and spread chicken into even layer. Cook, without stirring, until chicken begins to brown, 60 to 90 seconds. Using tongs, flip chicken and cook, without stirring, until second side begins to brown 60 to 90 seconds. Push chicken to one side of skillet. Add eggs to clearing. Using rubber spatula, stir eggs gently and cook until set but still wet, 30 to 60 seconds. stir eggs and chicken and continue to cook breaking up large pieces of egg, until eggs are fully cooked, 30 to 60 seconds. Transfer chicken mixture to bowl.
- Heat 2 teaspoons of oil in now-empty Skillet until smoking. Add broccolini and 2 tablespoons sauce and toss to coat. Cover skillet and cook 2 minutes, stirring once halfway through cooking/ Remove lid and continue to cook until broccolini is crisp and very brown in spots, 2-3 minutes, stirring once halfway through cooking. Transfer broccolini to bowl with chicken mixture.
- Heat 2 teaspoons of oil in now-empty Skillet until smoking. Add half of noodles and 2 tablespoons sauce to coat. Cook until noodles are starting to brown in spots, about 2 minutes, stirring halfway through the cooking. Transfer noodles to bowl with chicken mixture. Repeat with remaining 2 teaspoons oil, remaining noodles. and remaining sauce. When second batch of noodles is cooked, add contents of bowl back to skillet and toss to combine. cook without stirring until everything is warmed through, 60 to 90 seconds. Transfer to platter and serve immediately, passing chile vinegar separately.
- Boneless skinless chicken lacks skin and bones to protect the delicate meat from over-cooking resulting in a dry, fibrous texture. To increase the margin of error while cooking boneless, skinless chicken, a baking soda and water solution is employed. The solution raises the meat’s pH preventing the meat proteins from bonding together as tightly as they would otherwise allowing us to cook the chicken thoroughly without fear of dry, chewy chicken. We wash the solution so the chicken/stir-fry doesn’t have a residual baking soda flavor.
- 1 heaping cup packed (~220 g) dates, pitted (deglet noor or medjool)*
- 1/4 cup (84 g) maple syrup or agave nectar (or honey if not vegan)
- 1/4 cup (64 g) creamy salted natural peanut butter or almond butter
- 1 cup (112 g) roasted unsalted almonds, loosely chopped (see instructions for roasting nuts)
- 1 1/2 cups (135 g) rolled oats (gluten-free for GF eaters)
- Process dates in a food processor until small bits remain (about 1 minute). It should form a "dough" like consistency. (Mine rolled into a ball.)
- Optional step: Toast your oats (and almonds if raw) in a 350-degree F (176 C) oven for 10-15 minutes or until slightly golden brown. Otherwise, leave them raw - I prefer the toasted flavor.
- Place oats, almonds and dates in a large mixing bowl - set aside.
- Warm honey and peanut butter in a small saucepan over low heat. Stir and pour over oat mixture and then mix, breaking up the dates to disperse throughout.
- Once thoroughly mixed, transfer to an 8x8-inch baking dish or other small pan lined with plastic wrap or parchment paper so they lift out easily.
- Press down firmly until uniformly flattened - use something flat, like a wooden spoon, to press down and really pack the bars, which helps them hold together better.
- Cover with parchment or plastic wrap, and let firm up in fridge or freezer for 15-20 minutes.
- Remove bars from pan and chop into 10 even bars (or 9 squares). Store in an airtight container for up to a few days. These bars can also be frozen for longer storage.
- Vary the flavours with some of these additions: chocolate chips, dried fruit, nuts, banana chips, vanilla, etc.
- 2 tablespoons canola oil, divided
- 3/4 teaspoon kosher salt, divided
- 1/2 teaspoon black pepper
- 1/2 teaspoon ground cumin
- 1/8 teaspoon ground cinnamon
- 1 (1-pound) pork tenderloin, trimmed
- 3 large shallots, quartered
- 8 ounces fresh cherries, pitted and halved
- 1/4 cup unsalted chicken stock
- 2 tablespoons balsamic vinegar
- 1/2 teaspoon brown sugar
- 1 tablespoon butter
- 1/4 cup coarsely chopped fresh flat-leaf parsley
- Preheat oven to 425°.
- Heat a large ovenproof skillet over medium-high heat. Add 1 tablespoon oil; swirl to coat. Combine 1/2 teaspoon salt, pepper, cumin, and cinnamon. Rub pork evenly with spice mixture. Add pork to pan; sauté 4 minutes. Turn pork over; place pan in oven and bake at 425° for 15 minutes or until a thermometer registers 140°. Remove pork from pan; place on a cutting board (do not wipe out pan). Let pork stand 10 minutes. Cut into thin slices.
- Add remaining 1 tablespoon oil to pan; swirl to coat. Add shallots and cherries; sprinkle with remaining 1/4 teaspoon salt. Place pan in oven; bake at 425° for 10 minutes (do not turn cherries). Carefully remove pan from oven; place over medium-high heat. Stir in stock, vinegar, and sugar; bring to a boil. Cook 4 minutes or until liquid is syrupy. Remove from heat; stir in butter. Serve cherry mixture with pork; sprinkle with parsley.